vRA 7.1 comes with a very nice out of the box user interface which brings us unattended installation features and more. All of this is provided via “guided commands” in the form of REST API calls. This new cool feature is accessible via the config page of the vRA virtual appliance VAMI interface.
This blog article describes how to use this new cool functionality.
In my example I am going to prepare my first vRA IaaS server from scratch, create my vRA IaaS SQL database on a remote SQL server and do the vRA IaaS web server installation. This all happens on a guided approach and will be fully automated and unattended.
[Prerequisites]
- Deploy and configure a vRA 7.1 virtual appliance.
- Deploy and configure a fresh new Windows 2012 R2 server.
- Apply the latest MS Hotfixes on this new Windows server.
- Install the vRA Management Agent with the credentials of your vRA IaaS service account on this new Windows server.
- Give your vRA IaaS Service account local administrator rights on this new Windows server.
- Make sure there is a remote SQL server available where your vRA IaaS Service account has been granted the sysadmin role and where MSDTC has been configured properly.
- Open the config page from the vRA virtual appliance VAMI interface. eg. https://pb0vrava07.flexlab.local:5480/config
 The red marked commands will be used in this example.
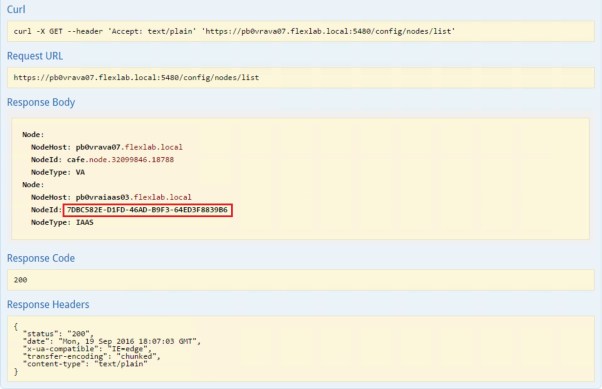
 - First we need to know the NodeId of the management agent running on the new deployed Windows server. To gather that information we are going to execute the GET /node/list command.
 Click on the Try it out! button and provide the root credentials of the vRA virtual appliance.
 If everything went OK, you see a Response Code of 200 and you can read the NodeId in the Response Body as shown below.
- Now we have the NodeId of the vRA IaaS server, we can prepare this Windows server for the installation of vRA IaaS components. To achieve this we are going to execute the PUT /execute/command/run-prereq/node/{nodeId} command.
 Before we are going to execute this command we need to provide the nodeId in here as also the correct parameters. When providing the parameters, make sure that the property ValidationMode is set to True. On this way we can validate the command upfront! If the Response code returns a 200 you are fine. This is also the signal that you can change the property ValidationMode to False and really execute the command. The [nodeid] and [parameters] I used for this command are:
123456789[nodeid]7DBC582E-D1FD-46AD-B9F3-64ED3F8839B6[parameters]{"ValidationMode": "True","Components": "Database;Website;ManagerService;Dem;Agent","ApplyFixes": "True"}
Now it’s time to click on the Try it out! button and check the Response Body and Response Code. As you can see the Response Code returns a 200. Now change ValidationMode to False in the parameters section and click again on the Try it out! button. When the Response Body returns a Status: COMPLETED, the prerequisite command has been finished.
 - Reboot the vRA IaaS Server and proceed to the following command. We are now going to execute the PUT /execute/command/install-db/node/{nodeId} command. This time, the [nodeid] and [parameters] I used are:
1234567891011121314151617[nodeid]7DBC582E-D1FD-46AD-B9F3-64ED3F8839B6[parameters]{"ValidationMode":"true","UseExistingDatabase":"false","UseWindowsAuthentication":"true","UseEncryption":"false","LogPath":"","SqlUser":"","SqlServer":"pb0vrasql01.flexlab.local","DataPath":"","DatabaseName":"vRAIAAS03","SqlUserPassword":"","InstallationPath":"C:\\Program Files (x86)\\VMware\\vCAC"}
Again, if the Response Code returns a 200, change ValidationMode to False and click again on the Try it out! button. When the Response Body returns a Status: COMPLETED, the vRA IaaS Database Component Installation command has been finished.
1234567891011121314[Response Body]Parent command with id='c8f08cc9-36b0-4f51-90dd-90620678ae57' was created.Waiting all child commands to complete.......Command execution result:Command id: 5f20ea59-65ba-43e3-b01b-033947632027Type: install-dbNode id: 7DBC582E-D1FD-46AD-B9F3-64ED3F8839B6Node host: pb0vraiaas03.flexlab.localResult: The command was successfully executed.Result description:Status: COMPLETED[Resonse Code]200 - Lastly we are going to execute the PUT /execute/command/install-web/node/{nodeId} command. This time, the [nodeid] and [parameters] I used are:
123456789101112131415161718192021222324252627[nodeid]7DBC582E-D1FD-46AD-B9F3-64ED3F8839B6[parameters]{"VidmAdminPassword":"MyPassword!","ValidationMode":"true","UseExistingDatabase":"true","UseWindowsAuthentication":"true","WebCertificate":"","IaaSWebAddress":"pb0vraiaas03.flexlab.local","ServiceUserPassword":"MyPassword!","UseEncryption":"false","VraAddress":"pb0vrava07.flexlab.local","SqlUser":"","SqlServer":"pb0vrasql01.flexlab.local","DatabaseName":"vRAIAAS03","DefaultTenant":"vsphere.local","VidmAdminUser":"administrator@vsphere.local","ServiceUser":"FLEXLAB\\svcvraiaas","HttpsPort":"443","WebsiteName":"Default Web Site","VraWebCertificateThumbprint":"B9D040861416E60DE83E93121AF93F0A0CBFD23C","SecurityPassphrase":"FlexPass!","SqlUserPassword":"","InstallationPath":"C:\\Program Files (x86)\\VMware\\vCAC"}
Again, if the Response Code returns a 200, change ValidationMode to False and click again on the Try it out! button. When the Response Body returns a Status: COMPLETED, the vRA IaaS Web Component Installation command has been finished. - Enjoy Automating vRA
