
My upcoming blog posts will be dedicated to my LBaaS journey. With LBaaS, I am referring to “Load Balancer as a Service”. In my journey, I am going to explain how you can create a NSX based edge device, configured as a vRealize Automation 7.x Infrastructure Load Balancer what will be offered as a self service catalog item within vRealize Automation.
The first part of the journey is all about the relevant REST API calls to the NSX manager. On a high level, the following steps will be followed in this part of the journey.
- Create the NSX Edge device
- Configure the NSX Edge device as a vRA 7.x infrastructure Load Balancer
- Capture the NSX Edge device config via a REST API call
- Modify the NSX Edge device config
- Deploy a new NSX Edge device via a REST API call
In the next section, I am going to explain these high level steps in much more detail
- The first task is to create your nsx edge device and configure it as you want. Because my use-case is all about creating a vRA 7.x Infrastructure Load Balancer, I used the following VMware document as my reference (https://docs.vmware.com/en/vRealize-Automation/7.4/vrealize-automation-load-balancing.pdf). The NSX-V version I am using is 6.4.3. Please write down the Id of the nsx edge device, we need this Id later in this blog-post. The Id of my template nsx edge device = edge-60.


- No we have created the template nsx edge device, we want to capture all of it’s configuration. To achieve this, we need to execute a REST API command to the NSX Manager. However, before we can execute REST API commands to the NSX Manager, we need to authenticate to the NSX Manager REST API. I am using Postman in this blog-post as my REST Client. In the below screenshots, you can see how I managed to get an Authorization Header for my future REST API calls to the NSX Manager.


- Now we have the Authorization Header, we need to add two additional Headers. With these two additional headers, we make sure that the Response Body of the REST API call, will be in json format.

- Now we have all the ingredients to execute the right REST API call to capture the configuration of our template nsx edge device, we can execute the following REST API call.
1GET https://pb0nsx02.flexlab.local/api/4.0/edges/edge-60
Make sure you have the 3 Headers configured as explained earlier in this blog-post. As you can see in this REST API call, we also needed to provide in here the Id of the template nsx edge device. The outcome of this REST API call is the configuration of the template nsx edge device in json format.
123456789101112131415161718192021222324252627282930313233343536373839404142434445464748495051525354555657585960616263646566676869707172737475767778798081828384858687888990919293949596979899100101102103104105106107108109110111112113114115116117118119120121122123124125126127128129130131132133134135136137138139140141142143144145146147148149150151152153154155156157158159160161162163164165166167168169170171172173174175176177178179180181182183184185186187188189190191192193194195196197198199200201202203204205206207208209210211212213214215216217218219220221222223224225226227228229230231232233234235236237238239240241242243244245246247248249250251252253254255256257258259260261262263264265266267268269270271272273274275276277278279280281282283284285286287288289290291292293294295296297298299300301302303304305306307308309310311312313314315316317318319320321322323324325326327328329330331332333334335336337338339340341342343344345346347348349350351352353354355356357358359360361362363364365366367368369370371372373374375376377378379380381382383384385386387388389390391392393394395396397398399400401402403404405406407408409410411412413414415416417418419420421422423424425426427428429430431432433434435436437438439440441442443444445446447448449450451452453454455456457458459460461462463464465466467468469470471472473474475476477478479480481482483484485486487488489490491492493494495496497498499500501502503504505506507508509510511512513514515516517518519520521522523524525526527528529530531532533534535536537538539540541542543544545546547548549550551552553554555556557558559560561562563564565566567568569570571572573574575576577578579580581582583584585586587588589590591592593594595596597598599600601602603604605606607608609610611612613614615616617618619620621622623624625626627628629630631632633634635636637638639640641642643644645646647648649650651652653654655656657658659660661662663664665666667668669670671672673674675676677678679680681682683684685686687688689690691692693694695696697698699700701702703704705706707708709710711712713714715716717718719720721722723724725726727728729730731732733734735736737738739740741742743744745746747748749750751752753754755756757758759760761762763764765766767768769770771772773774775776777778779780781782783784785786787788789790791792793794795796797798799800801802803804805806807808809810811812813814815816817818819820821822823824825826827828829830831832833834835836837838839840841842843844845846847848849850851852853854855856857858859860861862863864865866867868869870871872873874875876877878879880881882883884885886887888889890891892893894895896897898899900901902903904905906907908909910911912913914915916917918919920921922923924925926927928929930931932933934935936937938939940941942943944945946947948949950951952953954955956957958959960961962963964965966967968969970971972973974975976977978979980981982983984985986987988989990991992993994995996997998{"id": "edge-60","version": 79,"status": "deployed","datacenterMoid": "datacenter-21","datacenterName": "FlexLab","tenant": "default","name": "pb0vrainfra02","fqdn": "pb0vrainfra02.flexlab.local","enableAesni": true,"enableFips": false,"vseLogLevel": "info","vnics": {"vnics": [{"label": "vNic_0","name": "Uplink01","addressGroups": {"addressGroups": [{"primaryAddress": "10.1.111.28","secondaryAddresses": {"type": "secondary_addresses","ipAddress": ["10.1.111.202","10.1.111.205","10.1.111.203"]},"subnetMask": "255.255.0.0","subnetPrefixLength": "16"}]},"mtu": 1500,"type": "uplink","isConnected": true,"index": 0,"portgroupId": "dvportgroup-270","portgroupName": "dvVLAN1 Management","enableProxyArp": false,"enableSendRedirects": false},{"label": "vNic_1","name": "vnic1","addressGroups": {"addressGroups": []},"mtu": 1500,"type": "internal","isConnected": false,"index": 1,"enableProxyArp": false,"enableSendRedirects": true},{"label": "vNic_2","name": "vnic2","addressGroups": {"addressGroups": []},"mtu": 1500,"type": "internal","isConnected": false,"index": 2,"enableProxyArp": false,"enableSendRedirects": true},{"label": "vNic_3","name": "vnic3","addressGroups": {"addressGroups": []},"mtu": 1500,"type": "internal","isConnected": false,"index": 3,"enableProxyArp": false,"enableSendRedirects": true},{"label": "vNic_4","name": "vnic4","addressGroups": {"addressGroups": []},"mtu": 1500,"type": "internal","isConnected": false,"index": 4,"enableProxyArp": false,"enableSendRedirects": true},{"label": "vNic_5","name": "vnic5","addressGroups": {"addressGroups": []},"mtu": 1500,"type": "internal","isConnected": false,"index": 5,"enableProxyArp": false,"enableSendRedirects": true},{"label": "vNic_6","name": "vnic6","addressGroups": {"addressGroups": []},"mtu": 1500,"type": "internal","isConnected": false,"index": 6,"enableProxyArp": false,"enableSendRedirects": true},{"label": "vNic_7","name": "vnic7","addressGroups": {"addressGroups": []},"mtu": 1500,"type": "internal","isConnected": false,"index": 7,"enableProxyArp": false,"enableSendRedirects": true},{"label": "vNic_8","name": "vnic8","addressGroups": {"addressGroups": []},"mtu": 1500,"type": "internal","isConnected": false,"index": 8,"enableProxyArp": false,"enableSendRedirects": true},{"label": "vNic_9","name": "vnic9","addressGroups": {"addressGroups": []},"mtu": 1500,"type": "internal","isConnected": false,"index": 9,"enableProxyArp": false,"enableSendRedirects": true}]},"appliances": {"applianceSize": "compact","appliances": [{"highAvailabilityIndex": 0,"vcUuid": "502a5f9c-32af-1b15-2718-fbdd5fb785ef","vmId": "vm-52521","resourcePoolId": "resgroup-2606","resourcePoolName": "FlexLab (dc3bda67-4a1b-42d9-ae48-cb5fa0472b69)","datastoreId": "datastore-52321","datastoreName": "PURE02","hostId": "host-381","hostName": "pb0svr114.flexlab.local","vmFolderId": "group-v22","vmFolderName": "vm","vmHostname": "pb0vrainfra02.flexlab.local-0","vmName": "pb0vrainfra02-0","deployed": true,"edgeId": "edge-60","configuredResourcePool": {"id": "resgroup-2606","name": "FlexLab (dc3bda67-4a1b-42d9-ae48-cb5fa0472b69)","isValid": true},"configuredDataStore": {"id": "datastore-52321","name": "PURE02","isValid": true},"configuredHost": {"id": "host-381","name": "pb0svr114.flexlab.local","isValid": true},"configuredVmFolder": {"id": "group-v22","name": "vm","isValid": true}}],"deployAppliances": true},"cliSettings": {"remoteAccess": false,"userName": "admin","sshLoginBannerText": "\n***************************************************************************\nNOTICE TO USERS\n\n\nThis computer system is the private property of its owner, whether\nindividual, corporate or government. It is for authorized use only.\nUsers (authorized or unauthorized) have no explicit or implicit\nexpectation of privacy.\n\nAny or all uses of this system and all files on this system may be\nintercepted, monitored, recorded, copied, audited, inspected, and\ndisclosed to your employer, to authorized site, government, and law\nenforcement personnel, as well as authorized officials of government\nagencies, both domestic and foreign.\n\nBy using this system, the user consents to such interception, monitoring,\nrecording, copying, auditing, inspection, and disclosure at the\ndiscretion of such personnel or officials. Unauthorized or improper use\nof this system may result in civil and criminal penalties and\nadministrative or disciplinary action, as appropriate. By continuing to\nuse this system you indicate your awareness of and consent to these terms\nand conditions of use. LOG OFF IMMEDIATELY if you do not agree to the\nconditions stated in this warning.\n\n****************************************************************************","passwordExpiry": "99999"},"featureConfigs": {"features": [{"featureType": "nat","version": 11,"enabled": true,"rules": {"natRulesDtos": [{"ruleId": 196609,"ruleTag": 196609,"loggingEnabled": false,"enabled": true,"description": "loadBalancer","translatedAddress": "10.1.111.205","ruleType": "internal_high","action": "dnat","vnic": "0","originalAddress": "10.1.111.205","dnatMatchSourceAddress": "any","protocol": "tcp","originalPort": "443","translatedPort": "443","dnatMatchSourcePort": "any"},{"ruleId": 196610,"ruleTag": 196610,"loggingEnabled": false,"enabled": true,"description": "loadBalancer","translatedAddress": "10.1.111.202","ruleType": "internal_high","action": "dnat","vnic": "0","originalAddress": "10.1.111.202","dnatMatchSourceAddress": "any","protocol": "tcp","originalPort": "443","translatedPort": "443","dnatMatchSourcePort": "any"},{"ruleId": 196611,"ruleTag": 196611,"loggingEnabled": false,"enabled": true,"description": "loadBalancer","translatedAddress": "10.1.111.203","ruleType": "internal_high","action": "dnat","vnic": "0","originalAddress": "10.1.111.203","dnatMatchSourceAddress": "any","protocol": "tcp","originalPort": "443","translatedPort": "443","dnatMatchSourcePort": "any"},{"ruleId": 196612,"ruleTag": 196612,"loggingEnabled": false,"enabled": true,"description": "loadBalancer","translatedAddress": "10.1.111.205","ruleType": "internal_high","action": "dnat","vnic": "0","originalAddress": "10.1.111.205","dnatMatchSourceAddress": "any","protocol": "tcp","originalPort": "8444","translatedPort": "8444","dnatMatchSourcePort": "any"},{"ruleId": 196613,"ruleTag": 196613,"loggingEnabled": false,"enabled": true,"description": "loadBalancer","translatedAddress": "10.1.111.205","ruleType": "internal_high","action": "dnat","vnic": "0","originalAddress": "10.1.111.205","dnatMatchSourceAddress": "any","protocol": "tcp","originalPort": "8283","translatedPort": "8283","dnatMatchSourcePort": "any"}]},"nat64Rules": {"nat64Rule": []}},{"featureType": "l2vpn","version": 6,"enabled": false,"logging": {"enable": true,"logLevel": "notice"}},{"featureType": "FeatureConfigDto"},{"featureType": "dns","version": 6,"enabled": false,"cacheSize": 16,"listeners": {"type": "dhs_listener","vnic": ["any"]},"dnsViews": {"dnsView": [{"viewId": "view-0","name": "vsm-default-view","enabled": true,"viewMatch": {"ipAddress": ["any"],"vnic": ["any"],"ipSet": []},"recursion": false}]},"logging": {"enable": false,"logLevel": "info"}},{"featureType": "FeatureConfigDto"},{"featureType": "syslog","version": 6,"enabled": false,"protocol": "udp"},{"featureType": "sslvpn_4.0","version": 6,"enabled": false,"logging": {"enable": true,"logLevel": "notice"},"advancedConfig": {"enableCompression": false,"forceVirtualKeyboard": false,"randomizeVirtualkeys": false,"preventMultipleLogon": false,"clientNotification": "","enablePublicUrlAccess": false,"timeout": {"forcedTimeout": 0,"sessionIdleTimeout": 10}},"clientConfiguration": {"autoReconnect": true,"upgradeNotification": false},"authenticationConfiguration": {"passwordAuthentication": {"authenticationTimeout": 1,"primaryAuthServers": {},"secondaryAuthServer": {}}},"layoutConfigurationDto": {"portalTitle": "VMware","companyName": "VMware","logoExtention": "jpg","logoUri": "/api/4.0/edges/edge-60/sslvpn/config/layout/images/portallogo","logoBackgroundColor": "56A2D4","titleColor": "996600","topFrameColor": "000000","menuBarColor": "999999","rowAlternativeColor": "FFFFFF","bodyColor": "FFFFFF","rowColor": "F5F5F5"}},{"featureType": "FeatureConfigDto"},{"featureType": "highavailability_4.0","version": 8,"enabled": false,"declareDeadTime": 15,"logging": {"enable": false,"logLevel": "info"},"security": {"enabled": false}},{"featureType": "routing_4.0","version": 16,"enabled": true,"routingGlobalConfig": {"routerId": "10.1.111.28","ecmp": false,"logging": {"enable": false,"logLevel": "info"}},"staticRouting": {"defaultRoute": {"vnic": "0","description": "","gatewayAddress": "10.1.0.1","adminDistance": 1},"staticRoutes": {"staticRoutes": []}},"ospf": {"enabled": false,"ospfAreas": {"ospfAreas": [{"areaId": 51,"type": "nssa","authentication": {"type": "none"},"translateType7ToType5": false},{"areaId": 0,"type": "normal","authentication": {"type": "none"}}]},"ospfInterfaces": {"ospfInterfaces": []},"redistribution": {"enabled": false,"rules": {"rules": []}},"gracefulRestart": true,"defaultOriginate": false},"bgp": {"enabled": false,"localAS": 65000,"localASNumber": "65000","bgpNeighbours": {"bgpNeighbours": []},"redistribution": {"enabled": false,"rules": {"rules": []}},"gracefulRestart": true,"defaultOriginate": false}},{"featureType": "gslb","version": 6,"enabled": false,"serviceTimeout": "6","persistentCache": {"maxSize": "20","ttl": "300"},"queryPort": "5666","logging": {"enable": false,"logLevel": "info"}},{"featureType": "FeatureConfigDto"},{"featureType": "firewall_4.0","version": 10,"enabled": false,"globalConfig": {"tcpPickOngoingConnections": false,"tcpAllowOutOfWindowPackets": false,"tcpSendResetForClosedVsePorts": true,"dropInvalidTraffic": true,"logInvalidTraffic": false,"tcpTimeoutOpen": 30,"tcpTimeoutEstablished": 21600,"tcpTimeoutClose": 30,"udpTimeout": 60,"icmpTimeout": 10,"icmp6Timeout": 10,"ipGenericTimeout": 120,"enableSynFloodProtection": false,"logIcmpErrors": false,"dropIcmpReplays": false,"enableSnmpAlg": true,"enableFtpAlg": true,"enableTftpAlg": true},"defaultPolicy": {"action": "accept","loggingEnabled": false},"firewallRules": {"firewallRules": [{"ruleId": 131073,"ruleTag": 131073,"name": "default rule for ingress traffic","ruleType": "default_policy","enabled": true,"loggingEnabled": false,"description": "default rule for ingress traffic","action": "accept"}]}},{"featureType": "ipsec_4.0","version": 6,"enabled": false,"logging": {"enable": true,"logLevel": "warning"},"sites": {"sites": []},"global": {"psk": "******","caCertificates": {"caCertificate": []},"crlCertificates": {"crlCertificate": []}}},{"featureType": "loadbalancer_4.0","version": 67,"enabled": true,"enableServiceInsertion": false,"accelerationEnabled": false,"virtualServer": [{"virtualServerId": "virtualServer-1","name": "vs-vRA-Portal","enabled": true,"ipAddress": "10.1.111.205","protocol": "https","port": "443","connectionLimit": 0,"connectionRateLimit": 0,"defaultPoolId": "pool-1","applicationProfileId": "applicationProfile-1","enableServiceInsertion": false,"accelerationEnabled": false,"applicationRuleId": []},{"virtualServerId": "virtualServer-2","name": "vs-IaaS-Web","enabled": true,"ipAddress": "10.1.111.202","protocol": "https","port": "443","connectionLimit": 0,"defaultPoolId": "pool-2","applicationProfileId": "applicationProfile-2","enableServiceInsertion": false,"accelerationEnabled": false,"applicationRuleId": []},{"virtualServerId": "virtualServer-3","name": "vs-IaaS-Mgr","enabled": true,"ipAddress": "10.1.111.203","protocol": "https","port": "443","connectionLimit": 0,"defaultPoolId": "pool-3","applicationProfileId": "applicationProfile-3","enableServiceInsertion": false,"accelerationEnabled": false,"applicationRuleId": []},{"virtualServerId": "virtualServer-4","name": "vs-vRA-RConsole","enabled": true,"ipAddress": "10.1.111.205","protocol": "https","port": "8444","connectionLimit": 0,"defaultPoolId": "pool-4","applicationProfileId": "applicationProfile-1","enableServiceInsertion": false,"accelerationEnabled": false,"applicationRuleId": []},{"virtualServerId": "virtualServer-5","name": "vs-vRO-Embedded-CC","enabled": true,"ipAddress": "10.1.111.205","protocol": "https","port": "8283","connectionLimit": 0,"defaultPoolId": "pool-5","applicationProfileId": "applicationProfile-4","enableServiceInsertion": false,"accelerationEnabled": false,"applicationRuleId": []}],"pool": [{"poolId": "pool-2","name": "pool-IaaS-Web","ipVersionFilter": "any","algorithm": "leastconn","transparent": false,"monitorId": [],"applicationRuleId": [],"member": [{"memberId": "member-4","ipAddress": "10.1.111.20","weight": 1,"monitorPort": 443,"port": 443,"maxConn": 0,"minConn": 0,"condition": "enabled","name": "pb0vraiaas20"}]},{"poolId": "pool-3","name": "pool-IaaS-Mgr","ipVersionFilter": "any","algorithm": "leastconn","transparent": false,"monitorId": [],"applicationRuleId": [],"member": [{"memberId": "member-5","ipAddress": "10.1.111.20","weight": 1,"monitorPort": 443,"port": 443,"maxConn": 0,"minConn": 0,"condition": "enabled","name": "pb0vraiaas20"}]},{"poolId": "pool-1","name": "pool-vRA-Portal","ipVersionFilter": "any","algorithm": "leastconn","transparent": false,"monitorId": [],"applicationRuleId": [],"member": [{"memberId": "member-1","ipAddress": "10.1.111.10","weight": 1,"monitorPort": 443,"port": 443,"maxConn": 0,"minConn": 0,"condition": "enabled","name": "pb0vrava10"},{"memberId": "member-2","ipAddress": "10.1.111.11","weight": 1,"monitorPort": 443,"port": 443,"maxConn": 0,"minConn": 0,"condition": "disabled","name": "pb0vrava11"},{"memberId": "member-3","ipAddress": "10.1.111.12","weight": 1,"monitorPort": 443,"port": 443,"maxConn": 0,"minConn": 0,"condition": "disabled","name": "pb0vrava12"}]},{"poolId": "pool-4","name": "pool-vRA-RConsole","ipVersionFilter": "any","algorithm": "leastconn","transparent": false,"monitorId": [],"applicationRuleId": [],"member": [{"memberId": "member-6","ipAddress": "10.1.111.10","weight": 1,"monitorPort": 443,"port": 8444,"maxConn": 0,"minConn": 0,"condition": "enabled","name": "pb0vrava10"},{"memberId": "member-7","ipAddress": "10.1.111.11","weight": 1,"monitorPort": 443,"port": 8444,"maxConn": 0,"minConn": 0,"condition": "disabled","name": "pb0vrava11"},{"memberId": "member-8","ipAddress": "10.1.111.12","weight": 1,"monitorPort": 443,"port": 8444,"maxConn": 0,"minConn": 0,"condition": "disabled","name": "pb0vrava12"}]},{"poolId": "pool-5","name": "pool-vRO-Embedded-CC","ipVersionFilter": "any","algorithm": "leastconn","transparent": false,"monitorId": [],"applicationRuleId": [],"member": [{"memberId": "member-9","ipAddress": "10.1.111.10","weight": 1,"monitorPort": 8283,"port": 8283,"maxConn": 0,"minConn": 0,"condition": "enabled","name": "pb0vrava10"},{"memberId": "member-10","ipAddress": "10.1.111.11","weight": 1,"monitorPort": 8283,"port": 8283,"maxConn": 0,"minConn": 0,"condition": "disabled","name": "pb0vrava11"},{"memberId": "member-11","ipAddress": "10.1.111.12","weight": 1,"monitorPort": 8283,"port": 8283,"maxConn": 0,"minConn": 0,"condition": "disabled","name": "pb0vrava12"}]}],"applicationProfile": [{"applicationProfileId": "applicationProfile-1","persistence": {"method": "sourceip","expire": "1800"},"name": "ap-vra-portal","insertXForwardedFor": false,"sslPassthrough": true,"template": "HTTPS","serverSslEnabled": false},{"applicationProfileId": "applicationProfile-2","persistence": {"method": "sourceip","expire": "1800"},"name": "ap-iaas-web","insertXForwardedFor": false,"sslPassthrough": true,"template": "HTTPS","serverSslEnabled": false},{"applicationProfileId": "applicationProfile-3","name": "ap-iaas-mgr","insertXForwardedFor": false,"sslPassthrough": true,"template": "HTTPS","serverSslEnabled": false},{"applicationProfileId": "applicationProfile-4","persistence": {"method": "sourceip"},"name": "ap-vro-cont-cen","insertXForwardedFor": false,"sslPassthrough": true,"template": "HTTPS","serverSslEnabled": false}],"applicationRule": [],"monitor": [{"monitorId": "monitor-1","type": "tcp","interval": 5,"timeout": 15,"maxRetries": 3,"name": "default_tcp_monitor"},{"monitorId": "monitor-2","type": "http","interval": 5,"timeout": 15,"maxRetries": 3,"method": "GET","url": "/","name": "default_http_monitor"},{"monitorId": "monitor-3","type": "https","interval": 5,"timeout": 15,"maxRetries": 3,"method": "GET","url": "/","name": "default_https_monitor"},{"monitorId": "monitor-5","type": "https","interval": 3,"timeout": 10,"maxRetries": 3,"method": "GET","url": "/vco-controlcenter/docs/","expected": "HTTP/1.1 200","name": "sm-vro-cont-cen"},{"monitorId": "monitor-4","type": "https","interval": 3,"timeout": 10,"maxRetries": 3,"method": "GET","url": "/vcac/services/api/health","expected": "204","name": "sm-vra-portal"},{"monitorId": "monitor-6","type": "https","interval": 3,"timeout": 10,"maxRetries": 3,"method": "GET","url": "/wapi/api/status/web","name": "sm-iaas-web","receive": "REGISTERED"},{"monitorId": "monitor-7","type": "https","interval": 3,"timeout": 10,"maxRetries": 3,"method": "GET","url": "/VMPSProvision","name": "sm-iaas-mgr","receive": "ProvisionService"}],"logging": {"enable": false,"logLevel": "info"}},{"featureType": "bridging","version": 6,"enabled": false,"bridges": []},{"featureType": "dhcp_4.0","version": 6,"enabled": false,"staticBindings": {"staticBindings": []},"ipPools": {"ipPools": []},"logging": {"enable": false,"logLevel": "info"}}]},"autoConfiguration": {"enabled": true,"rulePriority": "high"},"type": "gatewayServices","hypervisorAssist": false,"tunnels": {"tunnels": []},"isUniversal": false} - Now we have the main configuration of our template nsx edge device in json format, we are able to modify the contents. In this blog I am going to modify the following information:
123456789101112131415161718192021222324252627282930313233343536373839404142434445464748495051525354555657585960616263646566676869707172737475767778798081828384858687888990919293949596979899100101102103edge-name: Name for edge deviceedge-fqdn: FQDN for edge device{"id": "edge-60","version": 79,"status": "deployed","datacenterMoid": "datacenter-21","datacenterName": "FlexLab","tenant": "default","name": "edge-name","fqdn": "edge-fqdn","enableAesni": true,"enableFips": false,"vseLogLevel": "info","vnics": {pri-eth0-1: Primary IP Address of the edge device for vNIC0sec-eth0-1: First Secondary IP Address of the edge device for vNIC0sec-eth0-2: Second Secondary IP Address of the edge device for vNIC0sec-eth0-3: Third Secondary IP Address of the edge device for vNIC0"vnics": {"vnics": [{"label": "vNic_0","name": "Uplink01","addressGroups": {"addressGroups": [{"primaryAddress": "pri-eth0-1","secondaryAddresses": {"type": "secondary_addresses","ipAddress": ["sec-eth0-1","sec-eth0-2","sec-eth0-3"]},"subnetMask": "255.255.0.0","subnetPrefixLength": "16"}]},"mtu": 1500,"type": "uplink","isConnected": true,"index": 0,"portgroupId": "dvportgroup-270","portgroupName": "dvVLAN1 Management","enableProxyArp": false,"enableSendRedirects": false},appliance-vmhostname : Edge device appliance vm hostnameappliance-vmname : Edge device appliance vm name"appliances": {"applianceSize": "compact","appliances": [{"highAvailabilityIndex": 0,"vcUuid": "502a5f9c-32af-1b15-2718-fbdd5fb785ef","vmId": "vm-52521","resourcePoolId": "resgroup-2606","resourcePoolName": "FlexLab (dc3bda67-4a1b-42d9-ae48-cb5fa0472b69)","datastoreId": "datastore-52321","datastoreName": "PURE02","hostId": "host-381","hostName": "pb0svr114.flexlab.local","vmFolderId": "group-v22","vmFolderName": "vm","vmHostname": "appliance-vmhostname","vmName": "appliance-vmname","deployed": true,"edgeId": "edge-60","configuredResourcePool": {"id": "resgroup-2606","name": "FlexLab (dc3bda67-4a1b-42d9-ae48-cb5fa0472b69)","isValid": true},Replace the IP Addresses and Names of the vRA Appliances and the vRA IaaS Server nodes. In my example I replaced the following..10.1.111.10 : IP Address vRA Appliance node 1pb0vrava10 : Name for vRA Appliance node 110.1.111.11 : IP Address vRA Appliance node 2pb0vrava11 : Name for vRA Appliance node 210.1.111.12 : IP Address vRA Appliance node 3pb0vrava12 : Name for vRA Appliance node 310.1.111.20 : IP Address vRA IaaS Server node 1pb0vraiaas20 : Name for vRA IaaS Server node 1With the following..10.1.0.32 : IP Address vRA Appliance node 1pb0vrava01 : Name for vRA Appliance node 110.1.0.33 : IP Address vRA Appliance node 2pb0vrava02 : Name for vRA Appliance node 210.1.0.206 : IP Address vRA Appliance node 3pb0vrava03 : Name for vRA Appliance node 310.1.0.51 : IP Address vRA IaaS Server node 1pb0vraiaas02 : Name for vRA IaaS Server node 1 - The contents of the new configuration file used in my example looks now like the following:
123456789101112131415161718192021222324252627282930313233343536373839404142434445464748495051525354555657585960616263646566676869707172737475767778798081828384858687888990919293949596979899100101102103104105106107108109110111112113114115116117118119120121122123124125126127128129130131132133134135136137138139140141142143144145146147148149150151152153154155156157158159160161162163164165166167168169170171172173174175176177178179180181182183184185186187188189190191192193194195196197198199200201202203204205206207208209210211212213214215216217218219220221222223224225226227228229230231232233234235236237238239240241242243244245246247248249250251252253254255256257258259260261262263264265266267268269270271272273274275276277278279280281282283284285286287288289290291292293294295296297298299300301302303304305306307308309310311312313314315316317318319320321322323324325326327328329330331332333334335336337338339340341342343344345346347348349350351352353354355356357358359360361362363364365366367368369370371372373374375376377378379380381382383384385386387388389390391392393394395396397398399400401402403404405406407408409410411412413414415416417418419420421422423424425426427428429430431432433434435436437438439440441442443444445446447448449450451452453454455456457458459460461462463464465466467468469470471472473474475476477478479480481482483484485486487488489490491492493494495496497498499500501502503504505506507508509510511512513514515516517518519520521522523524525526527528529530531532533534535536537538539540541542543544545546547548549550551552553554555556557558559560561562563564565566567568569570571572573574575576577578579580581582583584585586587588589590591592593594595596597598599600601602603604605606607608609610611612613614615616617618619620621622623624625626627628629630631632633634635636637638639640641642643644645646647648649650651652653654655656657658659660661662663664665666667668669670671672673674675676677678679680681682683684685686687688689690691692693694695696697698699700701702703704705706707708709710711712713714715716717718719720721722723724725726727728729730731732733734735736737738739740741742743744745746747748749750751752753754755756757758759760761762763764765766767768769770771772773774775776777778779780781782783784785786787788789790791792793794795796797798799800801802803804805806807808809810811812813814815816817818819820821822823824825826827828829830831832833834835836837838839840841842843844845846847848849850851852853854855856857858859860861862863864865866867868869870871872873874875876877878879880881882883884885886887888889890891892893894895896897898899900901902903904905906907908909910911912913914915916917918919920921922923924925926927928929930931932933934935936937938939940941942943944945946947948949950951952953954955956957958959960961962963964965966967968969970971972973974975976977978979980981982983984985986987988989990991992993994995996997998{"id": "edge-60","version": 79,"status": "deployed","datacenterMoid": "datacenter-21","datacenterName": "FlexLab","tenant": "default","name": "pb0vrainfra01","fqdn": "pb0vrainfra01.flexlab.local","enableAesni": true,"enableFips": false,"vseLogLevel": "info","vnics": {"vnics": [{"label": "vNic_0","name": "Uplink01","addressGroups": {"addressGroups": [{"primaryAddress": "10.1.0.28","secondaryAddresses": {"type": "secondary_addresses","ipAddress": ["10.1.0.202","10.1.0.205","10.1.0.203"]},"subnetMask": "255.255.0.0","subnetPrefixLength": "16"}]},"mtu": 1500,"type": "uplink","isConnected": true,"index": 0,"portgroupId": "dvportgroup-270","portgroupName": "dvVLAN1 Management","enableProxyArp": false,"enableSendRedirects": false},{"label": "vNic_1","name": "vnic1","addressGroups": {"addressGroups": []},"mtu": 1500,"type": "internal","isConnected": false,"index": 1,"enableProxyArp": false,"enableSendRedirects": true},{"label": "vNic_2","name": "vnic2","addressGroups": {"addressGroups": []},"mtu": 1500,"type": "internal","isConnected": false,"index": 2,"enableProxyArp": false,"enableSendRedirects": true},{"label": "vNic_3","name": "vnic3","addressGroups": {"addressGroups": []},"mtu": 1500,"type": "internal","isConnected": false,"index": 3,"enableProxyArp": false,"enableSendRedirects": true},{"label": "vNic_4","name": "vnic4","addressGroups": {"addressGroups": []},"mtu": 1500,"type": "internal","isConnected": false,"index": 4,"enableProxyArp": false,"enableSendRedirects": true},{"label": "vNic_5","name": "vnic5","addressGroups": {"addressGroups": []},"mtu": 1500,"type": "internal","isConnected": false,"index": 5,"enableProxyArp": false,"enableSendRedirects": true},{"label": "vNic_6","name": "vnic6","addressGroups": {"addressGroups": []},"mtu": 1500,"type": "internal","isConnected": false,"index": 6,"enableProxyArp": false,"enableSendRedirects": true},{"label": "vNic_7","name": "vnic7","addressGroups": {"addressGroups": []},"mtu": 1500,"type": "internal","isConnected": false,"index": 7,"enableProxyArp": false,"enableSendRedirects": true},{"label": "vNic_8","name": "vnic8","addressGroups": {"addressGroups": []},"mtu": 1500,"type": "internal","isConnected": false,"index": 8,"enableProxyArp": false,"enableSendRedirects": true},{"label": "vNic_9","name": "vnic9","addressGroups": {"addressGroups": []},"mtu": 1500,"type": "internal","isConnected": false,"index": 9,"enableProxyArp": false,"enableSendRedirects": true}]},"appliances": {"applianceSize": "compact","appliances": [{"highAvailabilityIndex": 0,"vcUuid": "502a5f9c-32af-1b15-2718-fbdd5fb785ef","vmId": "vm-52521","resourcePoolId": "resgroup-2606","resourcePoolName": "FlexLab (dc3bda67-4a1b-42d9-ae48-cb5fa0472b69)","datastoreId": "datastore-52321","datastoreName": "PURE02","hostId": "host-381","hostName": "pb0svr114.flexlab.local","vmFolderId": "group-v22","vmFolderName": "vm","vmHostname": "pb0vrainfra01.flexlab.local-0","vmName": "pb0vrainfra01-0","deployed": true,"edgeId": "edge-60","configuredResourcePool": {"id": "resgroup-2606","name": "FlexLab (dc3bda67-4a1b-42d9-ae48-cb5fa0472b69)","isValid": true},"configuredDataStore": {"id": "datastore-52321","name": "PURE02","isValid": true},"configuredHost": {"id": "host-381","name": "pb0svr114.flexlab.local","isValid": true},"configuredVmFolder": {"id": "group-v22","name": "vm","isValid": true}}],"deployAppliances": true},"cliSettings": {"remoteAccess": false,"userName": "admin","sshLoginBannerText": "\n***************************************************************************\nNOTICE TO USERS\n\n\nThis computer system is the private property of its owner, whether\nindividual, corporate or government. It is for authorized use only.\nUsers (authorized or unauthorized) have no explicit or implicit\nexpectation of privacy.\n\nAny or all uses of this system and all files on this system may be\nintercepted, monitored, recorded, copied, audited, inspected, and\ndisclosed to your employer, to authorized site, government, and law\nenforcement personnel, as well as authorized officials of government\nagencies, both domestic and foreign.\n\nBy using this system, the user consents to such interception, monitoring,\nrecording, copying, auditing, inspection, and disclosure at the\ndiscretion of such personnel or officials. Unauthorized or improper use\nof this system may result in civil and criminal penalties and\nadministrative or disciplinary action, as appropriate. By continuing to\nuse this system you indicate your awareness of and consent to these terms\nand conditions of use. LOG OFF IMMEDIATELY if you do not agree to the\nconditions stated in this warning.\n\n****************************************************************************","passwordExpiry": "99999"},"featureConfigs": {"features": [{"featureType": "nat","version": 11,"enabled": true,"rules": {"natRulesDtos": [{"ruleId": 196609,"ruleTag": 196609,"loggingEnabled": false,"enabled": true,"description": "loadBalancer","translatedAddress": "10.1.0.205","ruleType": "internal_high","action": "dnat","vnic": "0","originalAddress": "10.1.0.205","dnatMatchSourceAddress": "any","protocol": "tcp","originalPort": "443","translatedPort": "443","dnatMatchSourcePort": "any"},{"ruleId": 196610,"ruleTag": 196610,"loggingEnabled": false,"enabled": true,"description": "loadBalancer","translatedAddress": "10.1.0.202","ruleType": "internal_high","action": "dnat","vnic": "0","originalAddress": "10.1.0.202","dnatMatchSourceAddress": "any","protocol": "tcp","originalPort": "443","translatedPort": "443","dnatMatchSourcePort": "any"},{"ruleId": 196611,"ruleTag": 196611,"loggingEnabled": false,"enabled": true,"description": "loadBalancer","translatedAddress": "10.1.0.203","ruleType": "internal_high","action": "dnat","vnic": "0","originalAddress": "10.1.0.203","dnatMatchSourceAddress": "any","protocol": "tcp","originalPort": "443","translatedPort": "443","dnatMatchSourcePort": "any"},{"ruleId": 196612,"ruleTag": 196612,"loggingEnabled": false,"enabled": true,"description": "loadBalancer","translatedAddress": "10.1.0.205","ruleType": "internal_high","action": "dnat","vnic": "0","originalAddress": "10.1.0.205","dnatMatchSourceAddress": "any","protocol": "tcp","originalPort": "8444","translatedPort": "8444","dnatMatchSourcePort": "any"},{"ruleId": 196613,"ruleTag": 196613,"loggingEnabled": false,"enabled": true,"description": "loadBalancer","translatedAddress": "10.1.0.205","ruleType": "internal_high","action": "dnat","vnic": "0","originalAddress": "10.1.0.205","dnatMatchSourceAddress": "any","protocol": "tcp","originalPort": "8283","translatedPort": "8283","dnatMatchSourcePort": "any"}]},"nat64Rules": {"nat64Rule": []}},{"featureType": "l2vpn","version": 6,"enabled": false,"logging": {"enable": true,"logLevel": "notice"}},{"featureType": "FeatureConfigDto"},{"featureType": "dns","version": 6,"enabled": false,"cacheSize": 16,"listeners": {"type": "dhs_listener","vnic": ["any"]},"dnsViews": {"dnsView": [{"viewId": "view-0","name": "vsm-default-view","enabled": true,"viewMatch": {"ipAddress": ["any"],"vnic": ["any"],"ipSet": []},"recursion": false}]},"logging": {"enable": false,"logLevel": "info"}},{"featureType": "FeatureConfigDto"},{"featureType": "syslog","version": 6,"enabled": false,"protocol": "udp"},{"featureType": "sslvpn_4.0","version": 6,"enabled": false,"logging": {"enable": true,"logLevel": "notice"},"advancedConfig": {"enableCompression": false,"forceVirtualKeyboard": false,"randomizeVirtualkeys": false,"preventMultipleLogon": false,"clientNotification": "","enablePublicUrlAccess": false,"timeout": {"forcedTimeout": 0,"sessionIdleTimeout": 10}},"clientConfiguration": {"autoReconnect": true,"upgradeNotification": false},"authenticationConfiguration": {"passwordAuthentication": {"authenticationTimeout": 1,"primaryAuthServers": {},"secondaryAuthServer": {}}},"layoutConfigurationDto": {"portalTitle": "VMware","companyName": "VMware","logoExtention": "jpg","logoUri": "/api/4.0/edges/edge-60/sslvpn/config/layout/images/portallogo","logoBackgroundColor": "56A2D4","titleColor": "996600","topFrameColor": "000000","menuBarColor": "999999","rowAlternativeColor": "FFFFFF","bodyColor": "FFFFFF","rowColor": "F5F5F5"}},{"featureType": "FeatureConfigDto"},{"featureType": "highavailability_4.0","version": 8,"enabled": false,"declareDeadTime": 15,"logging": {"enable": false,"logLevel": "info"},"security": {"enabled": false}},{"featureType": "routing_4.0","version": 16,"enabled": true,"routingGlobalConfig": {"routerId": "10.1.111.28","ecmp": false,"logging": {"enable": false,"logLevel": "info"}},"staticRouting": {"defaultRoute": {"vnic": "0","description": "","gatewayAddress": "10.1.0.1","adminDistance": 1},"staticRoutes": {"staticRoutes": []}},"ospf": {"enabled": false,"ospfAreas": {"ospfAreas": [{"areaId": 51,"type": "nssa","authentication": {"type": "none"},"translateType7ToType5": false},{"areaId": 0,"type": "normal","authentication": {"type": "none"}}]},"ospfInterfaces": {"ospfInterfaces": []},"redistribution": {"enabled": false,"rules": {"rules": []}},"gracefulRestart": true,"defaultOriginate": false},"bgp": {"enabled": false,"localAS": 65000,"localASNumber": "65000","bgpNeighbours": {"bgpNeighbours": []},"redistribution": {"enabled": false,"rules": {"rules": []}},"gracefulRestart": true,"defaultOriginate": false}},{"featureType": "gslb","version": 6,"enabled": false,"serviceTimeout": "6","persistentCache": {"maxSize": "20","ttl": "300"},"queryPort": "5666","logging": {"enable": false,"logLevel": "info"}},{"featureType": "FeatureConfigDto"},{"featureType": "firewall_4.0","version": 10,"enabled": false,"globalConfig": {"tcpPickOngoingConnections": false,"tcpAllowOutOfWindowPackets": false,"tcpSendResetForClosedVsePorts": true,"dropInvalidTraffic": true,"logInvalidTraffic": false,"tcpTimeoutOpen": 30,"tcpTimeoutEstablished": 21600,"tcpTimeoutClose": 30,"udpTimeout": 60,"icmpTimeout": 10,"icmp6Timeout": 10,"ipGenericTimeout": 120,"enableSynFloodProtection": false,"logIcmpErrors": false,"dropIcmpReplays": false,"enableSnmpAlg": true,"enableFtpAlg": true,"enableTftpAlg": true},"defaultPolicy": {"action": "accept","loggingEnabled": false},"firewallRules": {"firewallRules": [{"ruleId": 131073,"ruleTag": 131073,"name": "default rule for ingress traffic","ruleType": "default_policy","enabled": true,"loggingEnabled": false,"description": "default rule for ingress traffic","action": "accept"}]}},{"featureType": "ipsec_4.0","version": 6,"enabled": false,"logging": {"enable": true,"logLevel": "warning"},"sites": {"sites": []},"global": {"psk": "******","caCertificates": {"caCertificate": []},"crlCertificates": {"crlCertificate": []}}},{"featureType": "loadbalancer_4.0","version": 67,"enabled": true,"enableServiceInsertion": false,"accelerationEnabled": false,"virtualServer": [{"virtualServerId": "virtualServer-1","name": "vs-vRA-Portal","enabled": true,"ipAddress": "10.1.0.205","protocol": "https","port": "443","connectionLimit": 0,"connectionRateLimit": 0,"defaultPoolId": "pool-1","applicationProfileId": "applicationProfile-1","enableServiceInsertion": false,"accelerationEnabled": false,"applicationRuleId": []},{"virtualServerId": "virtualServer-2","name": "vs-IaaS-Web","enabled": true,"ipAddress": "10.1.0.202","protocol": "https","port": "443","connectionLimit": 0,"defaultPoolId": "pool-2","applicationProfileId": "applicationProfile-2","enableServiceInsertion": false,"accelerationEnabled": false,"applicationRuleId": []},{"virtualServerId": "virtualServer-3","name": "vs-IaaS-Mgr","enabled": true,"ipAddress": "10.1.0.203","protocol": "https","port": "443","connectionLimit": 0,"defaultPoolId": "pool-3","applicationProfileId": "applicationProfile-3","enableServiceInsertion": false,"accelerationEnabled": false,"applicationRuleId": []},{"virtualServerId": "virtualServer-4","name": "vs-vRA-RConsole","enabled": true,"ipAddress": "10.1.0.205","protocol": "https","port": "8444","connectionLimit": 0,"defaultPoolId": "pool-4","applicationProfileId": "applicationProfile-1","enableServiceInsertion": false,"accelerationEnabled": false,"applicationRuleId": []},{"virtualServerId": "virtualServer-5","name": "vs-vRO-Embedded-CC","enabled": true,"ipAddress": "10.1.0.205","protocol": "https","port": "8283","connectionLimit": 0,"defaultPoolId": "pool-5","applicationProfileId": "applicationProfile-4","enableServiceInsertion": false,"accelerationEnabled": false,"applicationRuleId": []}],"pool": [{"poolId": "pool-2","name": "pool-IaaS-Web","ipVersionFilter": "any","algorithm": "leastconn","transparent": false,"monitorId": [],"applicationRuleId": [],"member": [{"memberId": "member-4","ipAddress": "10.1.0.51","weight": 1,"monitorPort": 443,"port": 443,"maxConn": 0,"minConn": 0,"condition": "enabled","name": "pb0vraiaas02"}]},{"poolId": "pool-3","name": "pool-IaaS-Mgr","ipVersionFilter": "any","algorithm": "leastconn","transparent": false,"monitorId": [],"applicationRuleId": [],"member": [{"memberId": "member-5","ipAddress": "10.1.0.51","weight": 1,"monitorPort": 443,"port": 443,"maxConn": 0,"minConn": 0,"condition": "enabled","name": "pb0vraiaas02"}]},{"poolId": "pool-1","name": "pool-vRA-Portal","ipVersionFilter": "any","algorithm": "leastconn","transparent": false,"monitorId": [],"applicationRuleId": [],"member": [{"memberId": "member-1","ipAddress": "10.1.0.32","weight": 1,"monitorPort": 443,"port": 443,"maxConn": 0,"minConn": 0,"condition": "enabled","name": "pb0vrava01"},{"memberId": "member-2","ipAddress": "10.1.0.33","weight": 1,"monitorPort": 443,"port": 443,"maxConn": 0,"minConn": 0,"condition": "disabled","name": "pb0vrava02"},{"memberId": "member-3","ipAddress": "10.1.0.206","weight": 1,"monitorPort": 443,"port": 443,"maxConn": 0,"minConn": 0,"condition": "disabled","name": "pb0vrava03"}]},{"poolId": "pool-4","name": "pool-vRA-RConsole","ipVersionFilter": "any","algorithm": "leastconn","transparent": false,"monitorId": [],"applicationRuleId": [],"member": [{"memberId": "member-6","ipAddress": "10.1.0.32","weight": 1,"monitorPort": 443,"port": 8444,"maxConn": 0,"minConn": 0,"condition": "enabled","name": "pb0vrava01"},{"memberId": "member-7","ipAddress": "10.1.0.33","weight": 1,"monitorPort": 443,"port": 8444,"maxConn": 0,"minConn": 0,"condition": "disabled","name": "pb0vrava02"},{"memberId": "member-8","ipAddress": "10.1.0.206","weight": 1,"monitorPort": 443,"port": 8444,"maxConn": 0,"minConn": 0,"condition": "disabled","name": "pb0vrava03"}]},{"poolId": "pool-5","name": "pool-vRO-Embedded-CC","ipVersionFilter": "any","algorithm": "leastconn","transparent": false,"monitorId": [],"applicationRuleId": [],"member": [{"memberId": "member-9","ipAddress": "10.1.0.32","weight": 1,"monitorPort": 8283,"port": 8283,"maxConn": 0,"minConn": 0,"condition": "enabled","name": "pb0vrava01"},{"memberId": "member-10","ipAddress": "10.1.0.33","weight": 1,"monitorPort": 8283,"port": 8283,"maxConn": 0,"minConn": 0,"condition": "disabled","name": "pb0vrava02"},{"memberId": "member-11","ipAddress": "10.1.0.206","weight": 1,"monitorPort": 8283,"port": 8283,"maxConn": 0,"minConn": 0,"condition": "disabled","name": "pb0vrava03"}]}],"applicationProfile": [{"applicationProfileId": "applicationProfile-1","persistence": {"method": "sourceip","expire": "1800"},"name": "ap-vra-portal","insertXForwardedFor": false,"sslPassthrough": true,"template": "HTTPS","serverSslEnabled": false},{"applicationProfileId": "applicationProfile-2","persistence": {"method": "sourceip","expire": "1800"},"name": "ap-iaas-web","insertXForwardedFor": false,"sslPassthrough": true,"template": "HTTPS","serverSslEnabled": false},{"applicationProfileId": "applicationProfile-3","name": "ap-iaas-mgr","insertXForwardedFor": false,"sslPassthrough": true,"template": "HTTPS","serverSslEnabled": false},{"applicationProfileId": "applicationProfile-4","persistence": {"method": "sourceip"},"name": "ap-vro-cont-cen","insertXForwardedFor": false,"sslPassthrough": true,"template": "HTTPS","serverSslEnabled": false}],"applicationRule": [],"monitor": [{"monitorId": "monitor-1","type": "tcp","interval": 5,"timeout": 15,"maxRetries": 3,"name": "default_tcp_monitor"},{"monitorId": "monitor-2","type": "http","interval": 5,"timeout": 15,"maxRetries": 3,"method": "GET","url": "/","name": "default_http_monitor"},{"monitorId": "monitor-3","type": "https","interval": 5,"timeout": 15,"maxRetries": 3,"method": "GET","url": "/","name": "default_https_monitor"},{"monitorId": "monitor-5","type": "https","interval": 3,"timeout": 10,"maxRetries": 3,"method": "GET","url": "/vco-controlcenter/docs/","expected": "HTTP/1.1 200","name": "sm-vro-cont-cen"},{"monitorId": "monitor-4","type": "https","interval": 3,"timeout": 10,"maxRetries": 3,"method": "GET","url": "/vcac/services/api/health","expected": "204","name": "sm-vra-portal"},{"monitorId": "monitor-6","type": "https","interval": 3,"timeout": 10,"maxRetries": 3,"method": "GET","url": "/wapi/api/status/web","name": "sm-iaas-web","receive": "REGISTERED"},{"monitorId": "monitor-7","type": "https","interval": 3,"timeout": 10,"maxRetries": 3,"method": "GET","url": "/VMPSProvision","name": "sm-iaas-mgr","receive": "ProvisionService"}],"logging": {"enable": false,"logLevel": "info"}},{"featureType": "bridging","version": 6,"enabled": false,"bridges": []},{"featureType": "dhcp_4.0","version": 6,"enabled": false,"staticBindings": {"staticBindings": []},"ipPools": {"ipPools": []},"logging": {"enable": false,"logLevel": "info"}}]},"autoConfiguration": {"enabled": true,"rulePriority": "high"},"type": "gatewayServices","hypervisorAssist": false,"tunnels": {"tunnels": []},"isUniversal": false} - We can now try to deploy the template nsx edge device based on the modified json file as the REST Request Body. Again make sure you have also the 3 Headers configured . Now execute the following REST API call.
1POST https://pb0nsx02.flexlab.local/api/4.0/edges

- As you already discovered, the REST API call failed with the following error “HTTP Status 400 Bad Request”
12345{"errorCode": 10064,"details": "Blank/Null password is not allowed for NSX Edge Cli User. Please provide a valid password.","moduleName": "vShield Edge"} - The reason for this error is due to a missing password in the REST Request Body. This missing variable and it’s value are not part of the GET REST API call. To fix this issue with the REST API call, you need to modify the REST Request Body again and include the variable “password” with your password as the value. See the below example.
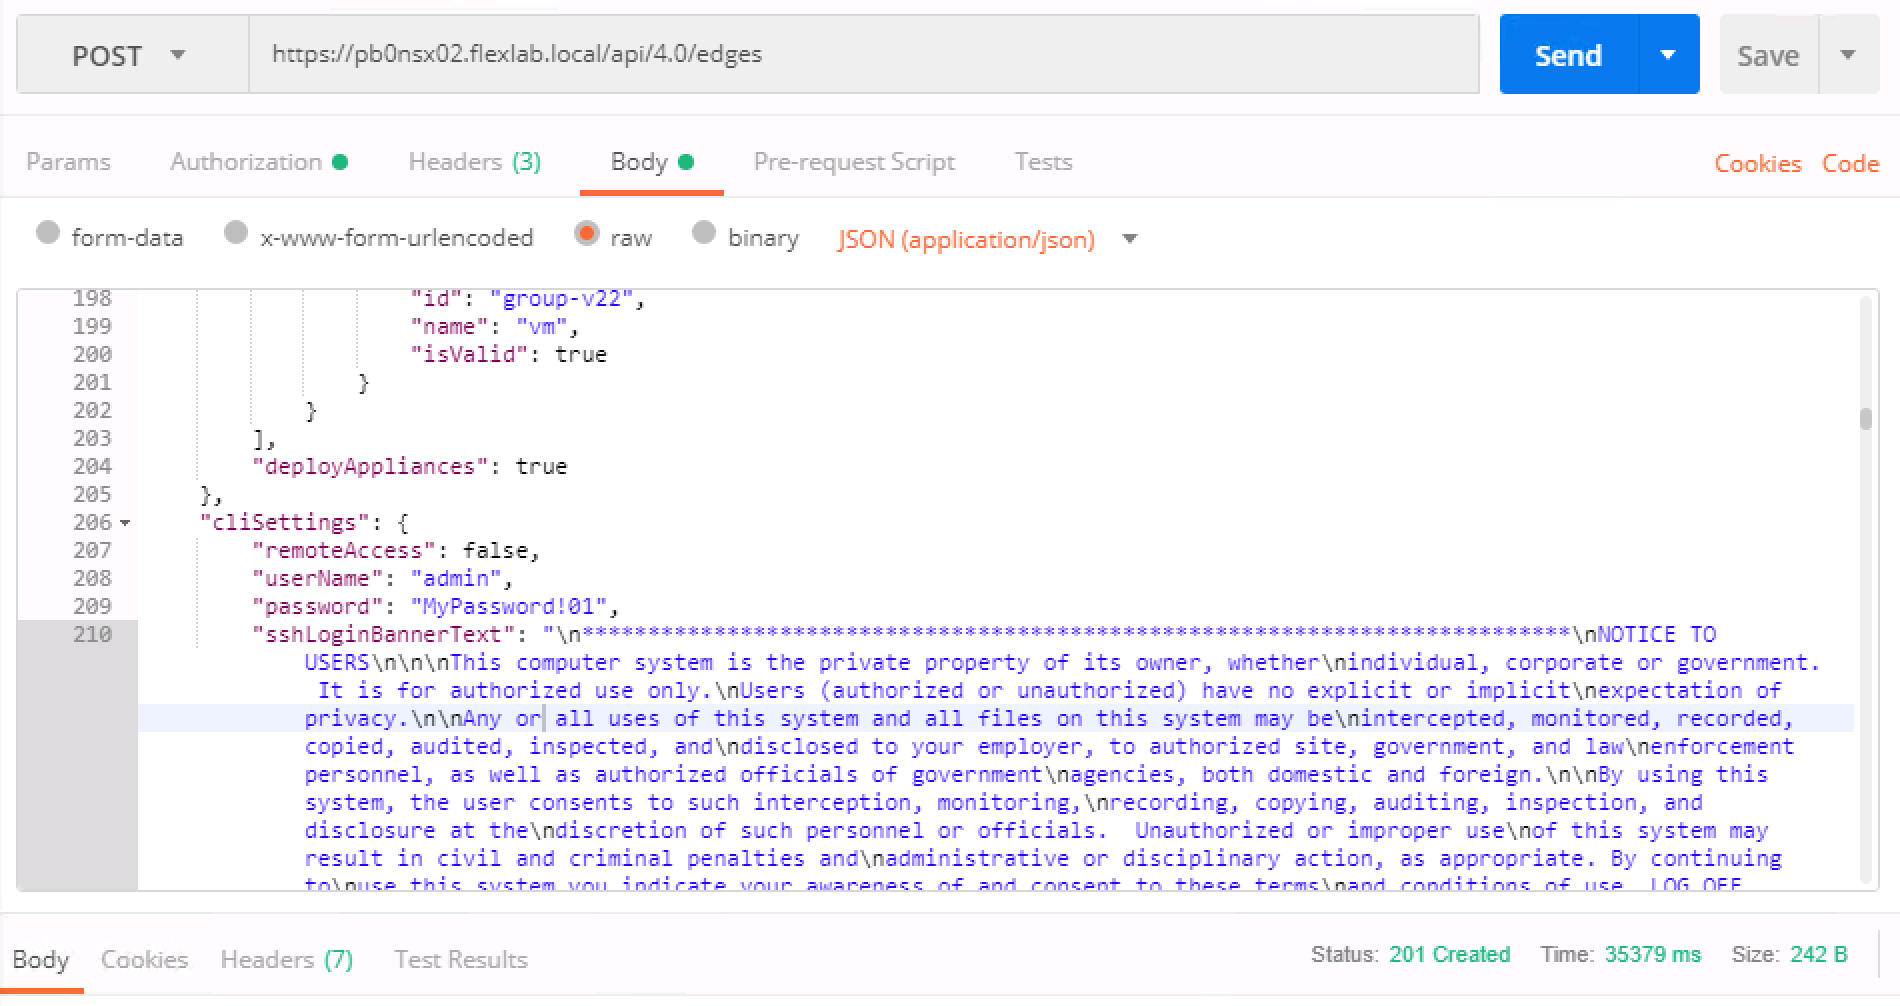
1234567"cliSettings": {"remoteAccess": false,"userName": "admin","password": "MyPassword!2018","sshLoginBannerText": "\n***************************************************************************\nNOTICE TO USERS\n\n\nThis computer system is the private property of its owner, whether\nindividual, corporate or government. It is for authorized use only.\nUsers (authorized or unauthorized) have no explicit or implicit\nexpectation of privacy.\n\nAny or all uses of this system and all files on this system may be\nintercepted, monitored, recorded, copied, audited, inspected, and\ndisclosed to your employer, to authorized site, government, and law\nenforcement personnel, as well as authorized officials of government\nagencies, both domestic and foreign.\n\nBy using this system, the user consents to such interception, monitoring,\nrecording, copying, auditing, inspection, and disclosure at the\ndiscretion of such personnel or officials. Unauthorized or improper use\nof this system may result in civil and criminal penalties and\nadministrative or disciplinary action, as appropriate. By continuing to\nuse this system you indicate your awareness of and consent to these terms\nand conditions of use. LOG OFF IMMEDIATELY if you do not agree to the\nconditions stated in this warning.\n\n****************************************************************************","passwordExpiry": "99999"}, - After we included the password variable into the REST Request Body, we can finally deploy a new nsx edge device based on the json configuration file. Again make sure you have also the 3 Headers configured. Execute again the following REST API call. This time the REST API call should succeed and it will return a status of 201 Created.
1POST https://pb0nsx02.flexlab.local/api/4.0/edges

- After a few moments you will see in your vCenter Client that a new nsx edge device has been deployed.


This is the end of part 1 of My LBaaS Journey blog series. I hope you enjoyed! In the next part of my Journey, I am going to develop a vRealize Orchestrator Workflow based on the REST API calls demonstrated in part 1 of the Journey.


